Vegan French Silk Pie
These mini chocolate mousse cakes were inspired by the popular French silk pie, but turned fully vegan! Here is my simple, crustless vegan French silk pie recipe.
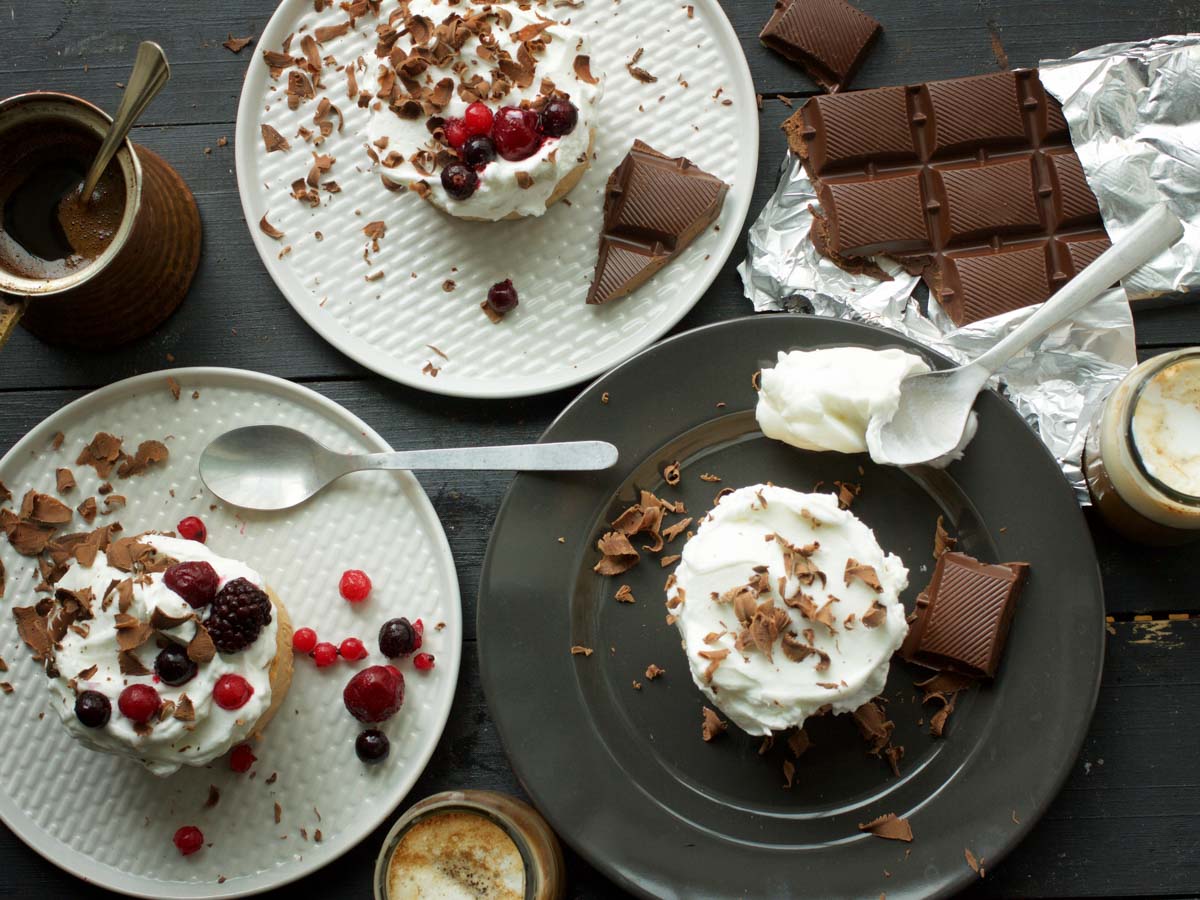
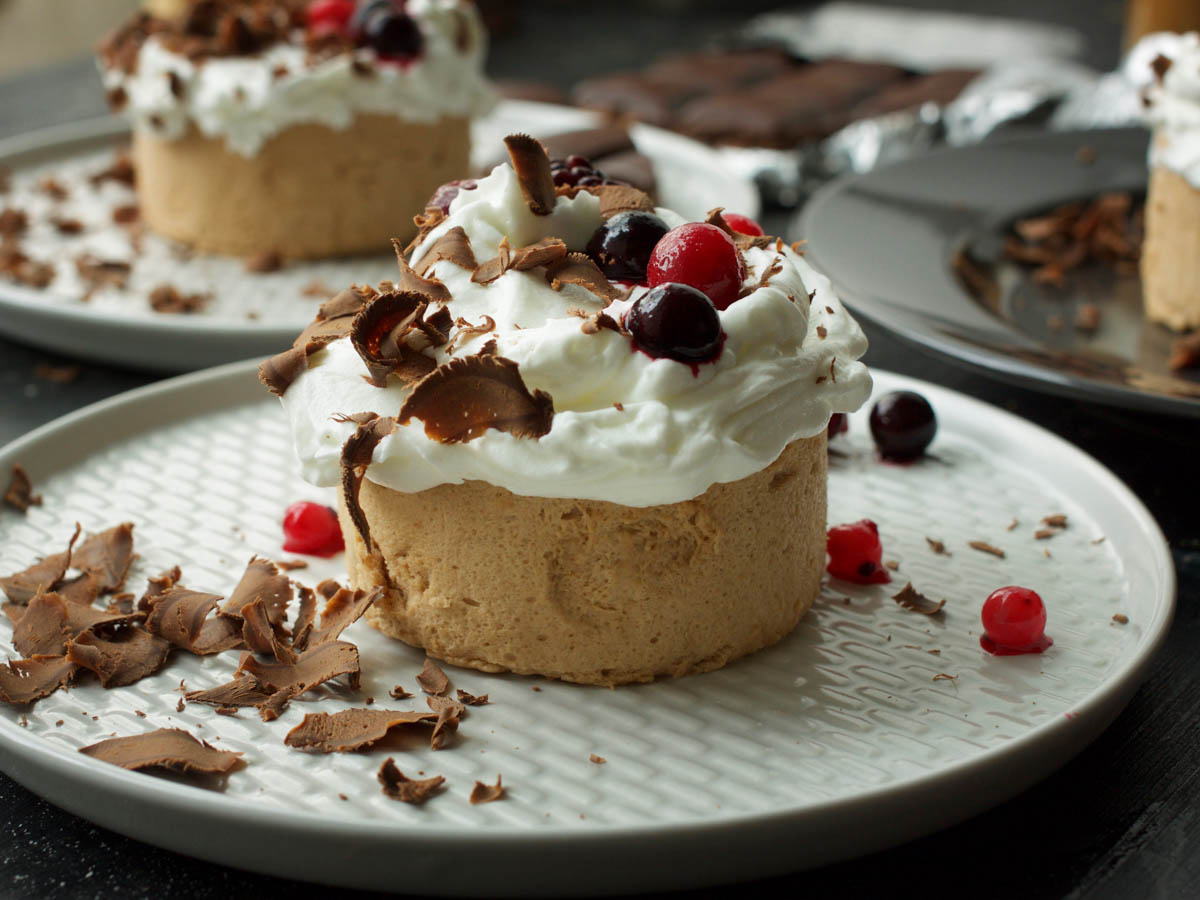
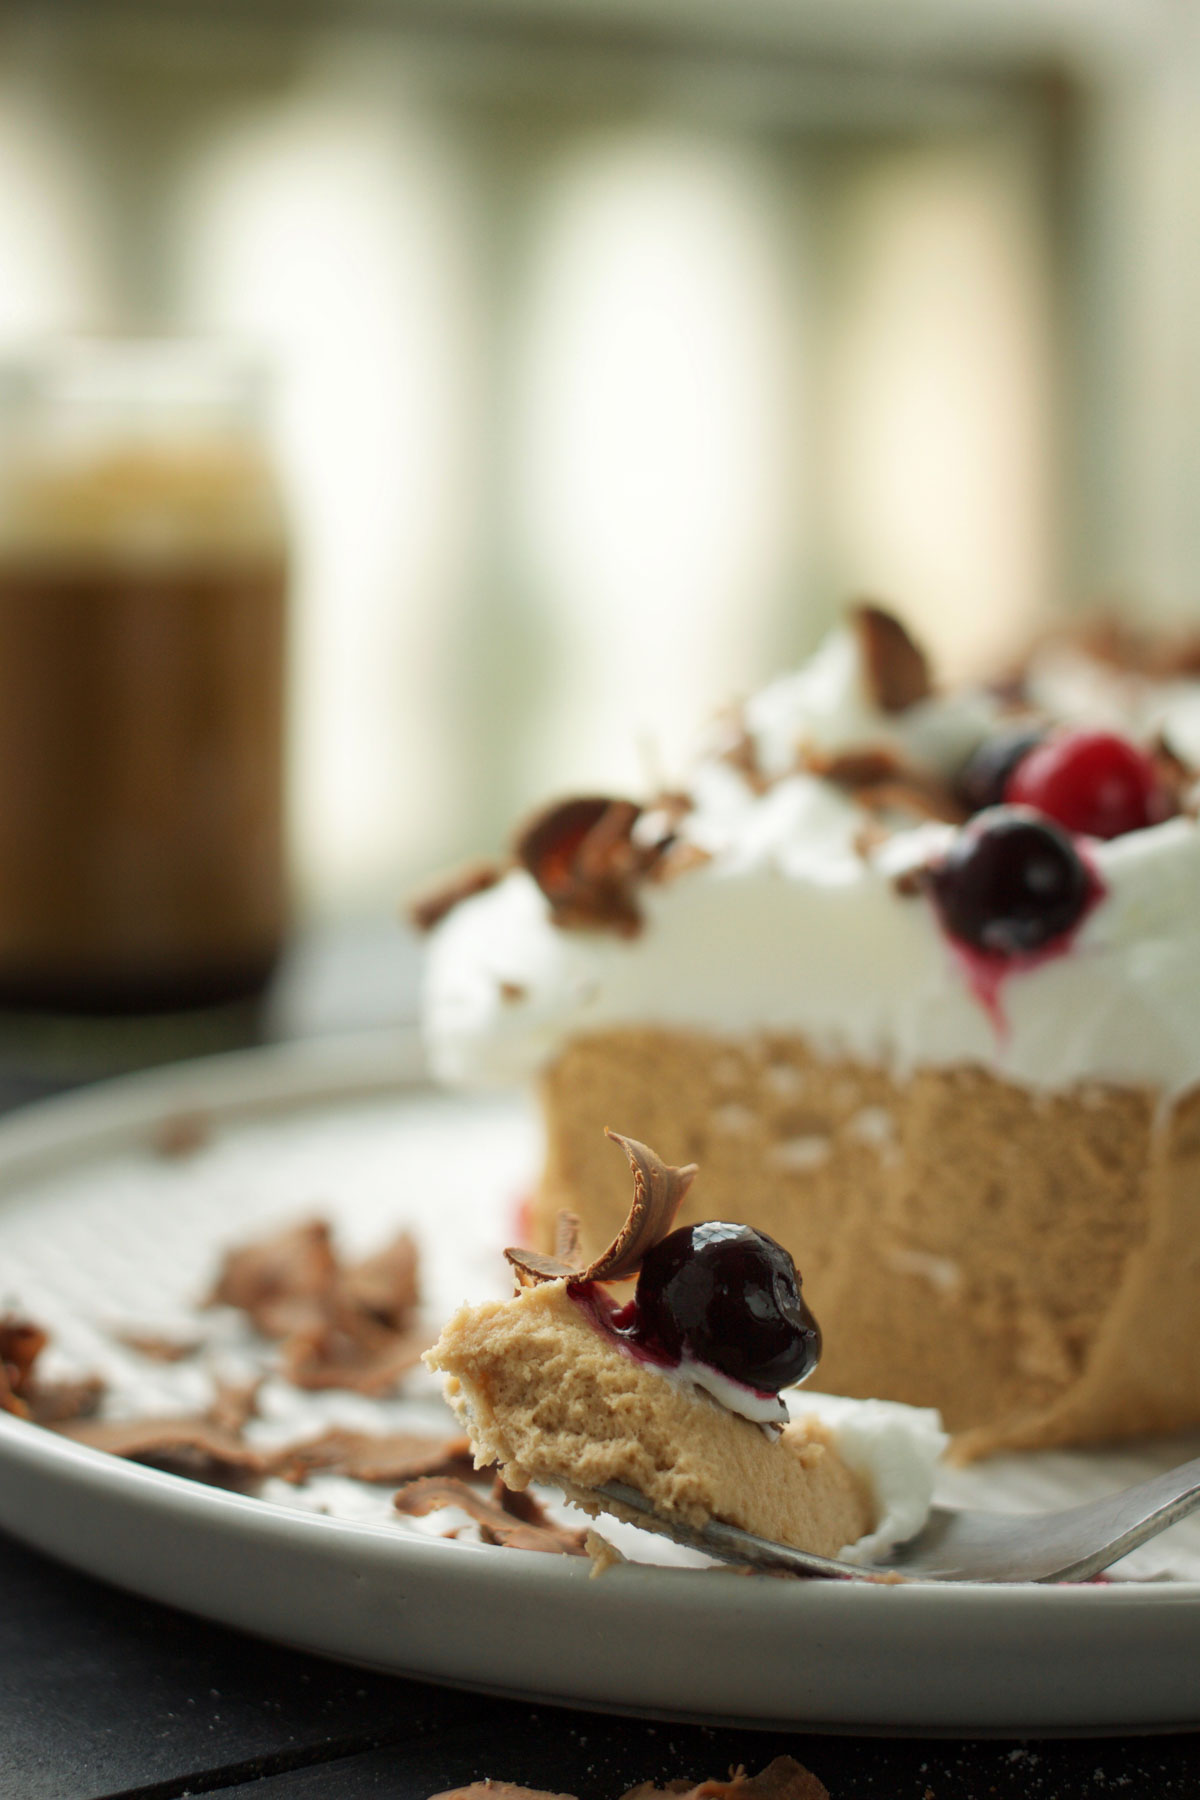
This vegan French silk pie is a set-in-the-fridge chocolate mousse cake, made with whipped coconut milk, melted raw cacao butter, and ripe avocado for that silky, airy texture. There is no baking, no eggs, and no dairy, and it comes together in a food processor plus a hand mixer. Serve each mini cake with coconut whipped cream, shredded dark chocolate, and a few berries for a dessert that tastes rich but feels light.
A French name for an American classic
The name is a little misleading. French silk pie is actually American: it first appeared in 1951 when Betty Cooper won a Pillsbury Bake-Off with an icebox-style chocolate pie. I decided to include mine in the French recipes section anyway, because my version is really an invention inspired by that famous pie rather than the original. I also made it vegan and without the crust. The classic has a chocolate pudding filling with a silky texture and a sweet pastry base, and I took it more toward the mousse side and skipped the crust entirely. This is a more minimalist and healthier approach, and I hope you will like it.
The ingredients that make it silky
This is a short list, but each ingredient is pulling its weight. A few notes before you start:
- Full-fat coconut milk, refrigerated overnight. You only want the thick, solid part that separates and rises to the top of the can. Chill it well and scoop out that firm cream, leaving the watery liquid behind. This is what whips up fluffy and gives the mousse its lift.
- Raw cacao butter. Melted gently, it sets firm when cold, so it is what holds these little cakes together once they chill overnight. Chop it small so it melts evenly.
- Ripe avocado. This is the secret to a smooth, creamy mousse without any dairy. A properly ripe avocado blends into silk and carries no green taste once the cacao and coffee go in.
- Cacao powder and a touch of instant coffee. The coffee does not make it taste like coffee; it deepens the chocolate flavor, a classic pastry trick.
- Maple syrup and a pinch of sea salt. Maple keeps it refined-sugar-free in the mousse, and the salt sharpens the chocolate.
- Coconut cream for the topping. Whipped with a little cane sugar and vanilla, it becomes the vegan whipped cream that finishes each cake.
How to get the mousse right
The texture is everything here, so a few small things make the difference between a firm, silky mousse and a soupy one:
- Chill the coconut milk properly. A full overnight in the fridge is what lets the thick cream separate. A warm or barely-chilled can will not whip.
- Let the melted cacao butter cool slightly before combining. If it is too hot, it can deflate the whipped coconut. Melt it over low heat in a double boiler, then stir in the cacao powder off the heat.
- Fold, do not beat. Combine the whipped coconut milk, the cacao butter mixture, and the avocado blend gently with a rubber spatula. You want to keep the air you whipped in, so mix just until it is even.
- Respect the overnight set. The cacao butter needs the cold to firm up. Give the mini cakes a full night in the fridge before you try to unmold them.
Serving and topping ideas
I served these mini chocolate mousse cakes with some vegan whipped cream made with coconut, and it was just the perfect combo. Top each one with the coconut whipped cream, then garnish with shredded dark chocolate and a few berries right before serving so the fruit stays fresh. If you love chocolate desserts like this, you might also enjoy my raw vegan chocolate and raspberry cake or these vegan chocolate muffins with caramelized walnuts. A cup of one of these healthy coffee drinks alongside makes the whole thing feel like a little celebration.
Make-ahead and storage
This dessert is made for planning ahead, since it needs an overnight set anyway. Keep the mousse cakes covered in the fridge and they hold their texture well for two to three days. I like to store the whipped coconut cream separately in a covered bowl and add it just before serving, so it stays fluffy and the cakes do not get soggy. Add the shredded chocolate and berries at the last minute for the best look and freshest fruit. If you want to prep even further ahead, the mousse layer can be made and chilled a day before you plan to serve, then topped when your guests arrive. For more no-bake ideas to keep on hand, take a look at my raw vegan coconut bonbons.
Give it a try and let me know if you liked it as much as I did. If you make these little chocolate mousse cakes, please come back to rate the recipe and leave a comment telling me how your mousse set and which berries you chose for the top.
Summarise & Save This Recipe
★ Add us as a trusted Google source
French Silk Pie
Ingredients
For the chocolate mousse:
- 3 ½ cups full-fat coconut milk canned, refrigerated overnight, just the thick part
- ⅓ cup raw cacao butter chopped
- 1 Tbsp cacao powder
- 2 Tbsp maple syrup
- 1 avocado ripe, peeled and pitted
- ½ tsp natural vanilla extract
- ⅓ tsp instant coffee
- 1 pinch sea salt
For the vegan whipped cream:
- 1 tbsp cane sugar
- 4 drops vanilla extract
- 1 cup coconut cream
For the topping:
- 2 Tbsp dark chocolate shredded
- 2 Tbsp berries
Instructions
- In a food processor or blender, add the avocado, maple syrup, vanilla, salt, and coffee.
- Process until smooth and fully incorporated. Set aside.
- In a double boiler, melt the cacao butter over low heat. Remove from heat and stir in the cacao powder.
- Use a hand mixer to whisk the thick part of the coconut milk until fluffy.
- Using a rubber spatula or wooden spoon, gently fold the whisked coconut milk into the melted cacao butter mixture and the avocado mixture. Mix until well incorporated.
- Divide the batter between the mini cake tins and place them in the fridge to set overnight.
- For the whipped cream, add the coconut cream, vanilla extract, and cane sugar to a large mixing bowl. Whisk with a hand mixer until fluffy, then refrigerate.
- To serve, gently unmold the cakes onto serving plates, top each with the whipped cream, and garnish with shredded dark chocolate and berries.
Notes
Frequently Asked Questions
Yes. This version uses no eggs, butter, or dairy cream. The silky filling comes from whipped full-fat coconut milk, melted raw cacao butter, and ripe avocado, and the topping is coconut cream whipped with a little cane sugar and vanilla. Just make sure the dark chocolate you use for garnish is a dairy-free variety.
The name is misleading. French silk pie is actually an American dessert that first appeared in 1951 when Betty Cooper won a Pillsbury Bake-Off with an icebox-style chocolate pie. The French silk name refers to the smooth, silky texture of the chocolate filling, not to a French origin.
No. A properly ripe avocado blends into a completely smooth, creamy base and its flavor disappears once the cacao powder, cacao butter, and a touch of instant coffee go in. The avocado is there for texture, giving you a silky mousse without any dairy.
Chilling full-fat canned coconut milk overnight lets the thick, solid cream separate and rise to the top, leaving the watery liquid at the bottom. You scoop out only that firm part to whip, which is what gives the mousse its fluffy, airy lift. A warm or barely-chilled can will not whip properly.
Kept covered in the fridge, the mousse cakes hold their texture well for two to three days. Store the whipped coconut cream separately and add it, along with the shredded chocolate and berries, just before serving so the topping stays fluffy and the fruit stays fresh.
The small amount of instant coffee does not make the dessert taste like coffee. It deepens and rounds out the chocolate flavor, which is a classic pastry trick used to make chocolate taste richer and more intense.

Thank you for the recipe! Made this dessert today for my kids and they loved it!
You’re welcome! Glad to hear your kids loved it!
How many servings does this recipe make?
3 mini-cakes, like the ones in the photo. 🙂 I would say 6 servings because one mini-cake is too much for one person.
Love the photos! I tried this last weekend and my family loved it! Thank you for this delicious recipe!
Thanks, Ellie!