Best Hummus Recipe
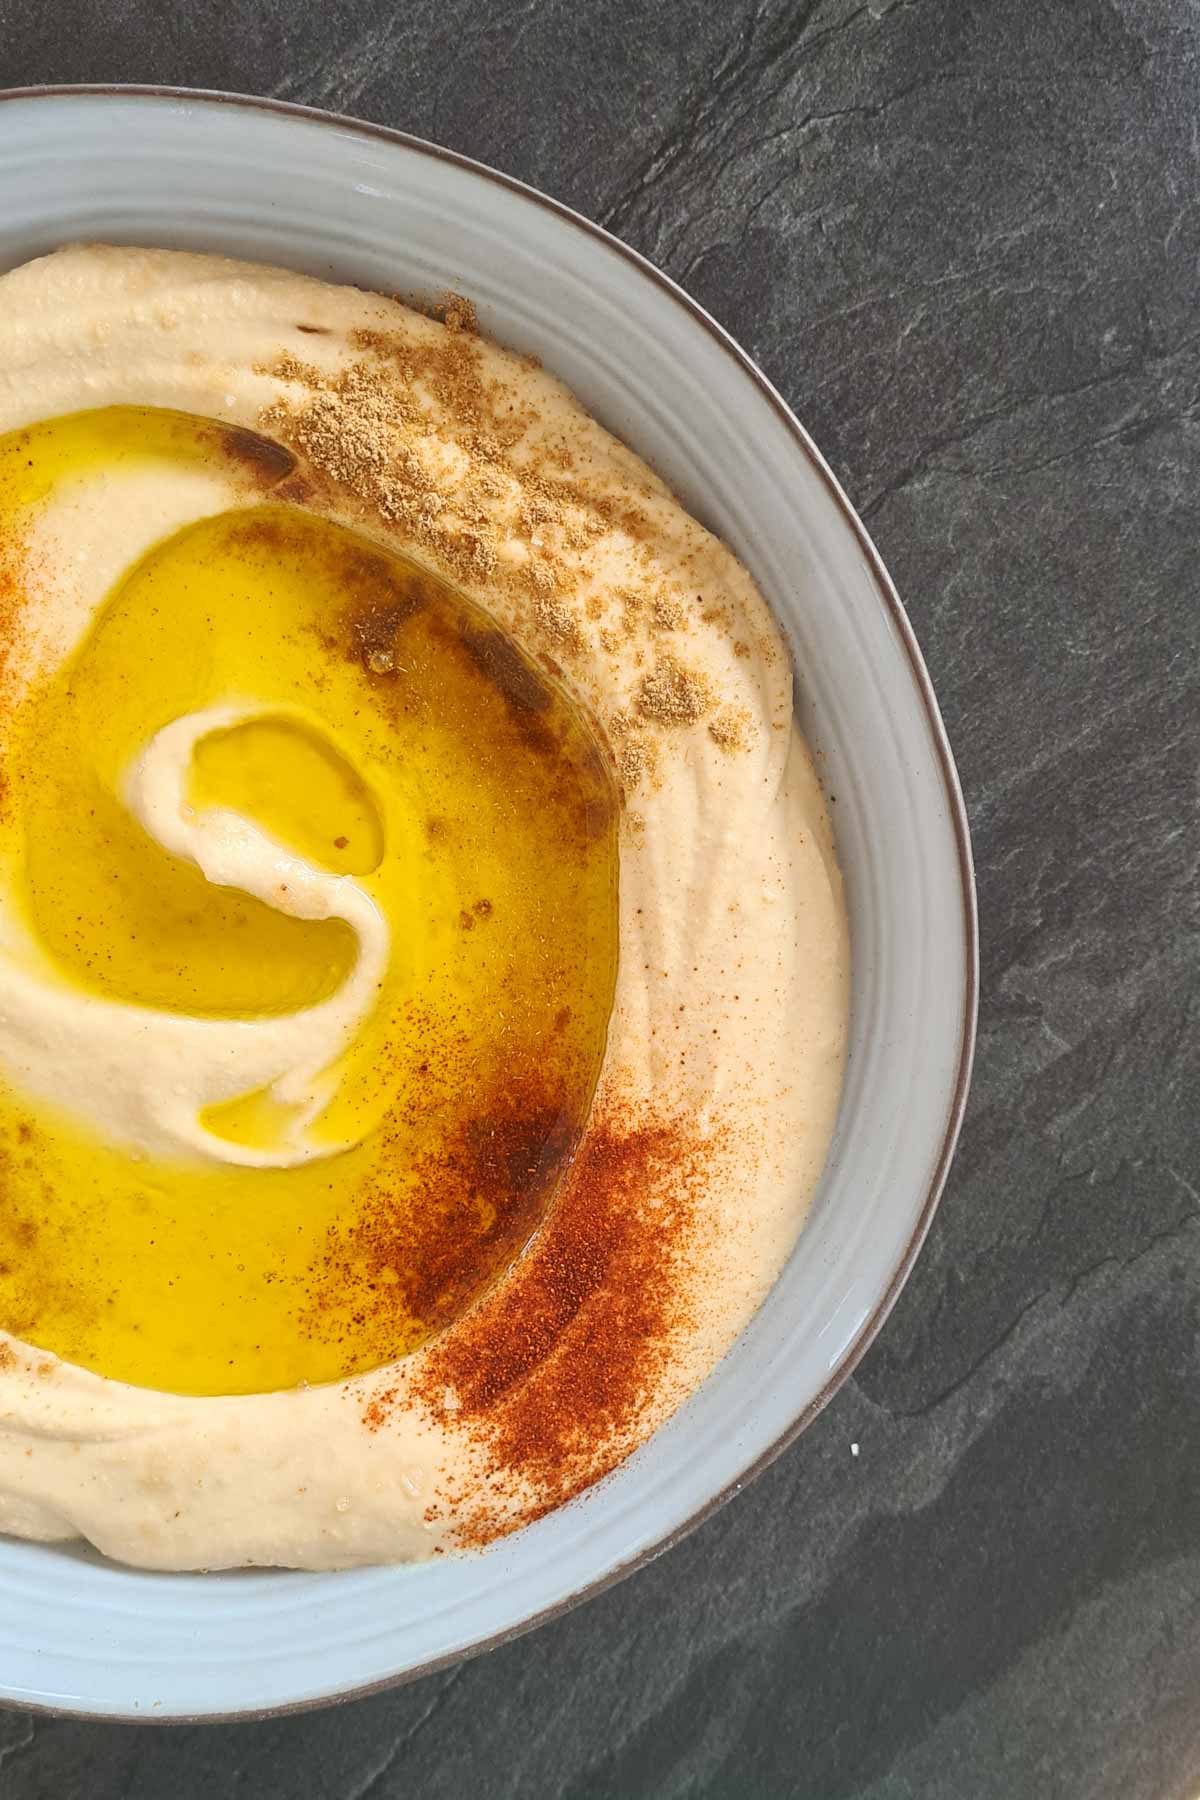
This simple hummus is the basic Lebanese-style recipe made easy, and it comes together in about five minutes once your chickpeas are ready. You blend cooked chickpeas with tahini, garlic, lemon juice, and ice cubes until creamy, then finish with a generous pour of olive oil on top. No peeling the chickpeas required, ever.
I am absolutely CRAZY about hummus. I could eat it for breakfast, lunch, dinner, and even as a snack, all in one day. Even though I have shared TONS of hummus recipes with you over the years, this simple, basic version remains one of my all-time favorites. It is the one I keep coming back to when I just want a big bowl of creaminess without thinking too hard about it.
Over time I also discovered some pretty important tricks that help you nail the consistency, and I am sharing all of them with you today. I think mastering the art of making hummus is a total MUST for everyone, especially if you are as big a fan as I am. Use this recipe and you will get the creamiest hummus each and every time. That is a promise.
This Recipe Works If You Need
- A fast, protein-rich dip you can pull together in about five minutes once the chickpeas are warm.
- A make-ahead spread for lunchboxes, snack plates, or a quick mezze board with friends.
- A reliable base recipe you can flavor a dozen different ways once you have the technique down.
- A budget-friendly option built around two cans of chickpeas, no special equipment beyond a food processor.
- A naturally vegan, dairy-free dip that still tastes rich and satisfying.
Why You’ll Love This Recipe
- No peeling required. I tried peeling the chickpeas myself, and I found it time-consuming and not worth it. Cooking the canned chickpeas a little longer softens the skins enough for a smooth result.
- It turns out incredibly creamy. The combination of warm chickpeas, plenty of tahini, and ice cubes whips up into something light and fluffy rather than dense and pasty.
- It uses pantry staples. Two cans of chickpeas, tahini, garlic, and a lemon are all you need for the base.
- It is endlessly adaptable. Once you have the master recipe, you can spin it into roasted pepper, avocado, or beet versions without missing a beat.
- It keeps beautifully. A layer of olive oil on top seals the surface so it stays fresh and does not dry out in the fridge.
Ingredient Notes
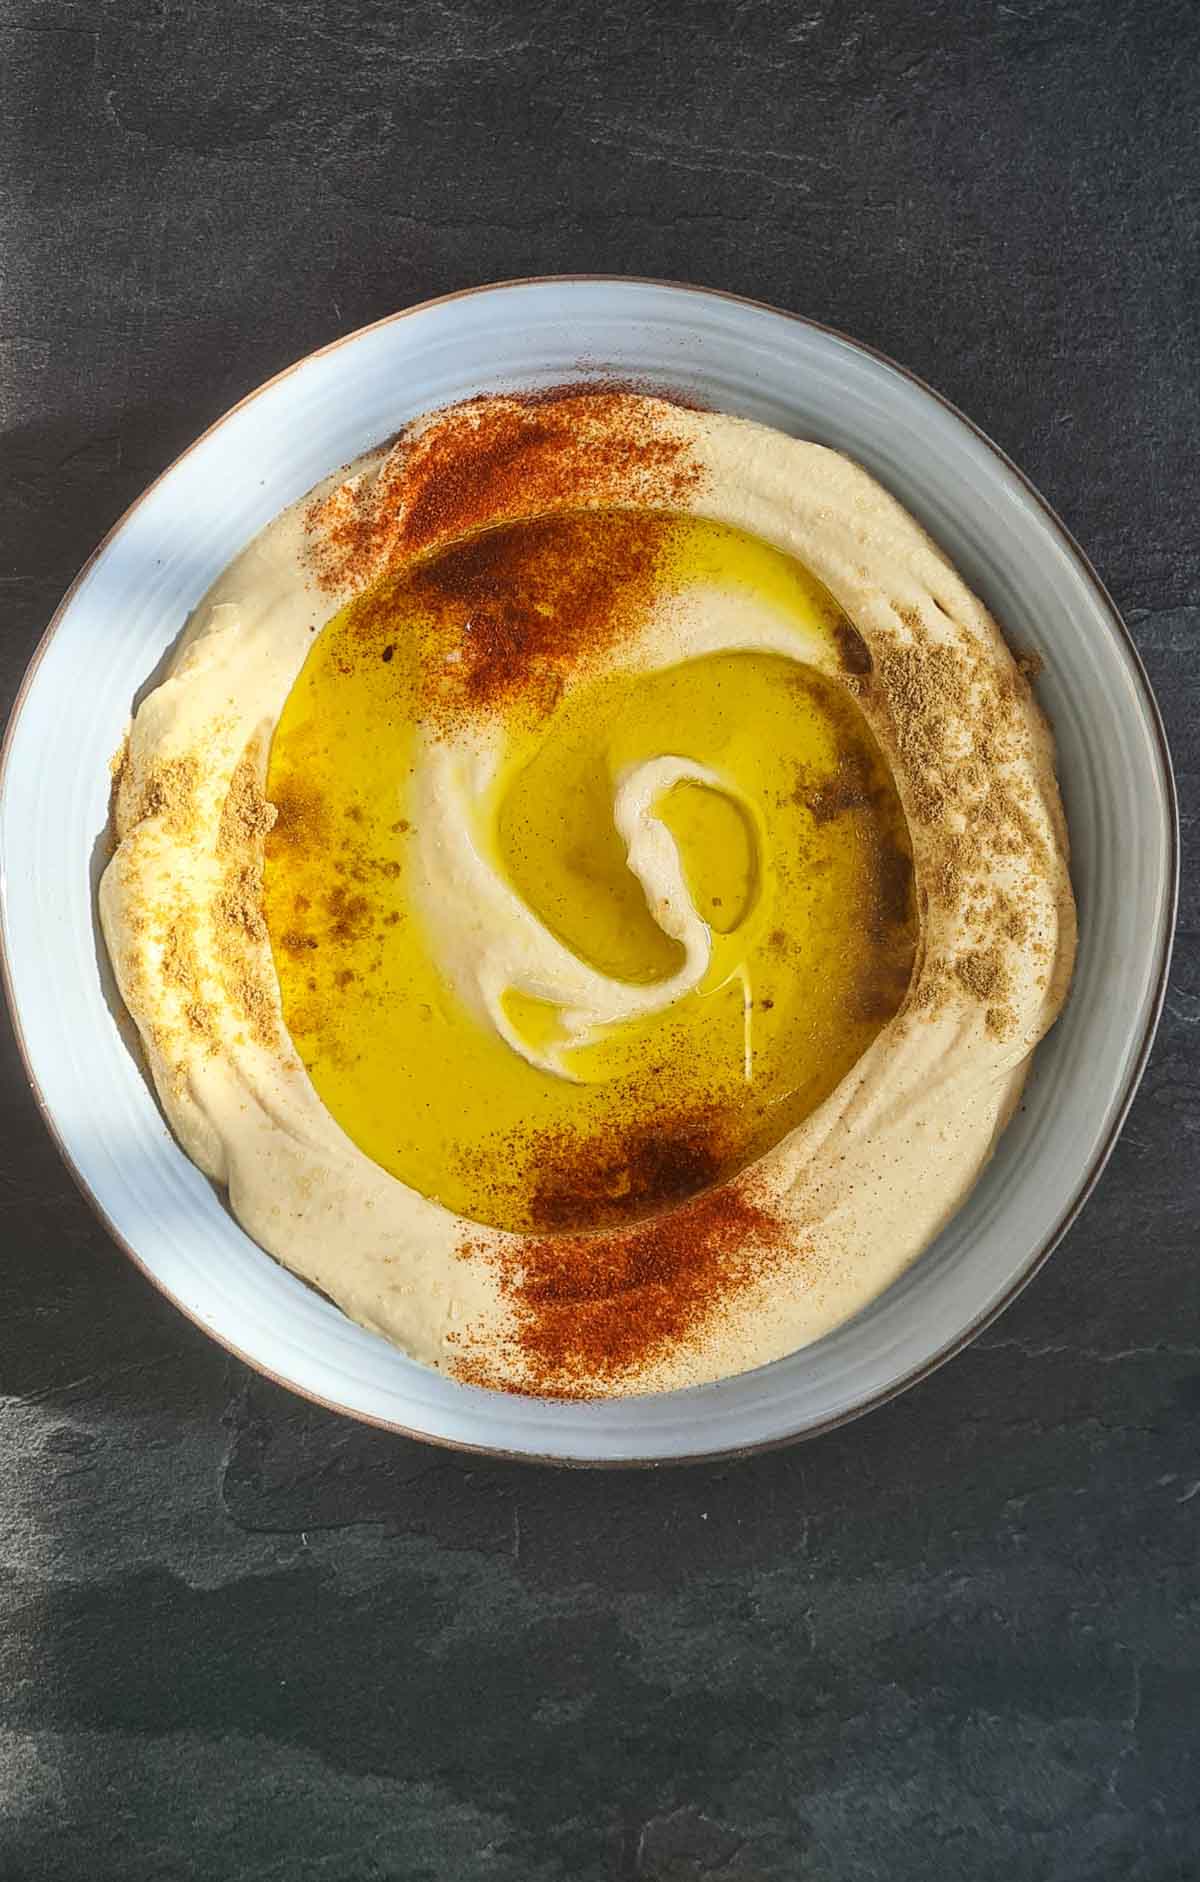
Chickpeas are the heart of this recipe, and yes, I use canned ones. They are consistent, save a huge amount of time, and there is no need to soak overnight. I keep two brands on hand all the time: the cheap one from Lidl, which does the job well, and the one from Darinne, which is definitely my favorite. The recipe quantities are for two 400g cans. One important step: drain them but keep the liquid from one can in a cup, because that starchy water is what you will use to loosen the hummus to the perfect texture.
Tahini is what gives hummus its signature richness and nutty depth, so do not skimp on it. This recipe uses 150g, which is a generous amount that keeps the dip from tasting flat. When you buy tahini, look for one made from 100% hulled sesame with a pourable, well-stirred consistency. If the oil has separated in the jar, stir it back in thoroughly before measuring, otherwise you will end up with a dry, bitter scoop from the bottom.
Garlic brings the bite. Two to three cloves is the sweet spot for me. Because the garlic goes in raw, fresh firm cloves make a real difference, so avoid any that have started to sprout green shoots, which taste sharp and slightly bitter. If raw garlic is too strong for you, start with two cloves and taste before adding the third.
Lemon juice from half a lemon brightens everything and balances the richness of the tahini. Always use freshly squeezed juice here, not bottled, because the fresh acidity is what makes hummus taste alive rather than heavy. Roll the lemon firmly on the counter before cutting it to get the most juice out.
Ice cubes are my favorite trick, and I discovered it while watching some Reels recently. You add three ice cubes during blending, and as they melt they whip air into the mixture and cool it down, which gives you that pale, fluffy, almost mousse-like texture. It sounds odd, but it works.
Salt and ground cumin season the dip. Add salt to taste, and a little cumin if you like, since it is very flavored and a small amount goes a long way. The cumin is optional, but it adds a warm, earthy note that I really enjoy.
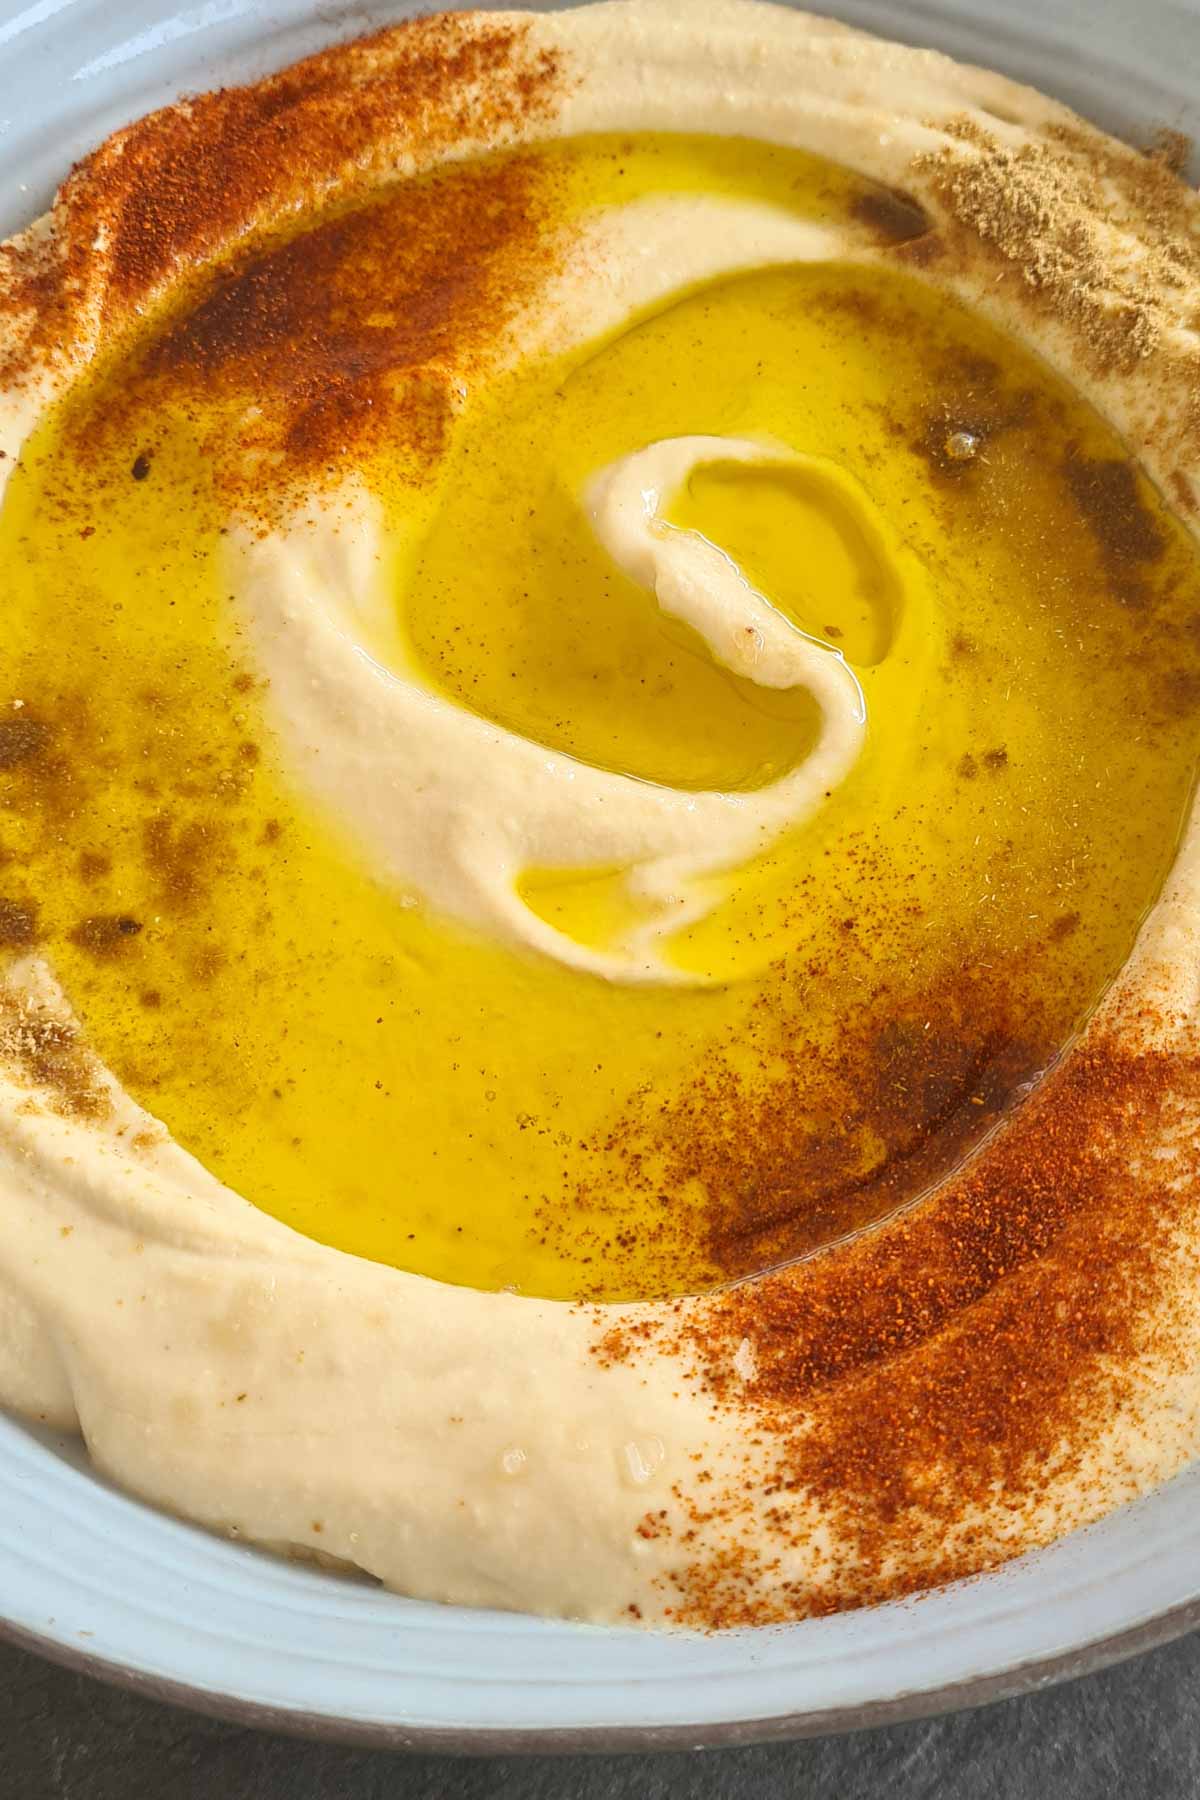
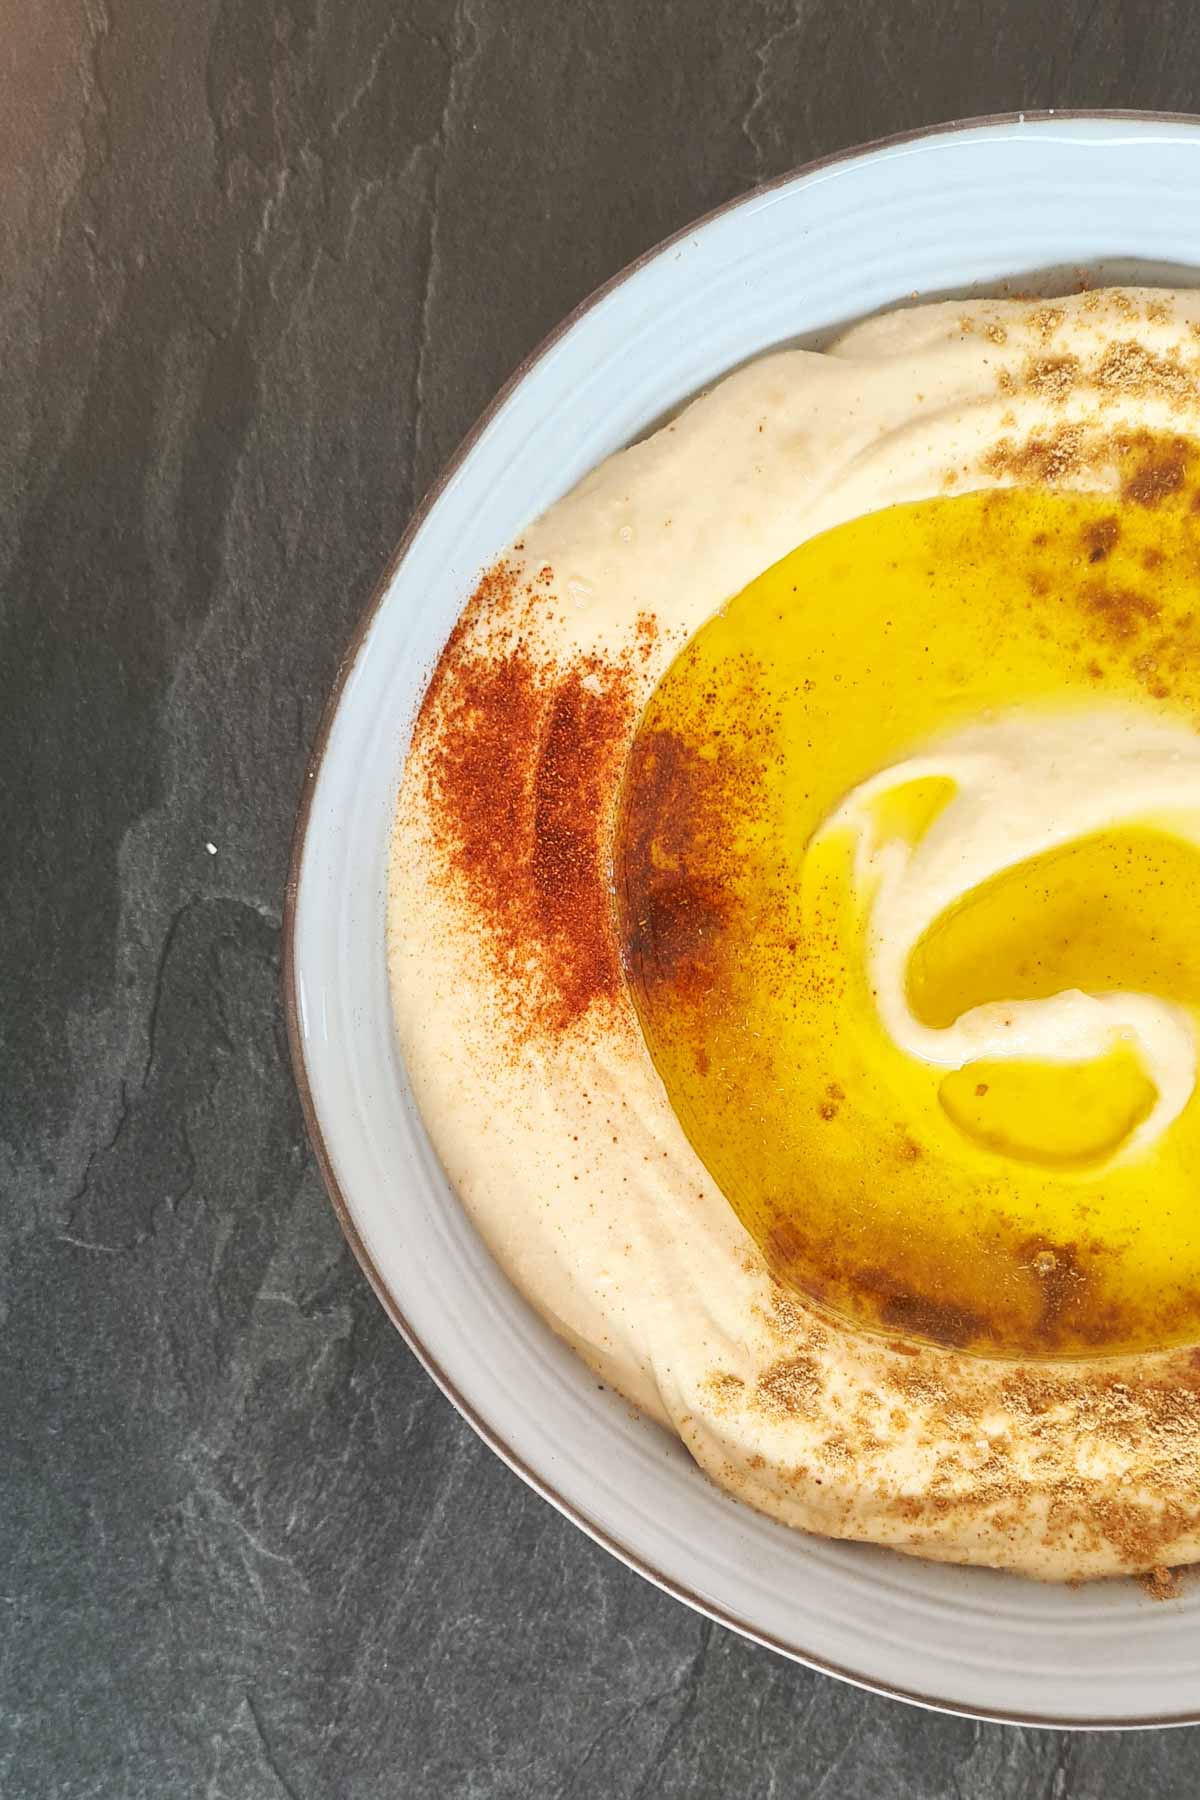
Olive oil is mandatory, but only as a topping. I know most recipes out there include olive oil in the mixing process, but I do not do that. I only add it at the end and pour it generously on top of the finished hummus. Use a good extra virgin oil here, since it is the finishing flavor you taste most.
Tips
- Cook the canned chickpeas a little longer. Add the drained chickpeas to a pot and let them simmer for another 15 minutes. Warm, extra-soft chickpeas blend far smoother than cold ones straight from the can, and this is the real reason you can skip peeling.
- Take your time when blending. This is one of my most important tips. Mix at high speed for a full five minutes, add the tahini, then process for another five. Patience is what turns a grainy paste into silky hummus, so do not rush it.
- Scrape down the bowl. Stop the processor once or twice to push the chickpeas down from the walls of the container so everything blends evenly. You know it is ready when the mixture looks pale, glossy, and holds soft peaks.
- Add the canned liquid gradually. I start with about 4 tablespoons, then add more of the reserved liquid little by little until I reach a creamy, fine texture. Pouring it all in at once is the most common mistake and leaves you with runny hummus.
- Do not try to blend all 800g at once. Your processor cannot handle the full quantity in one go. Work in two batches with a little extra liquid each time to keep the process smooth.
Substitutions and Variations
- Kitchen robot or blender. I prepare my hummus in a kitchen robot, a Philips one that does the job perfectly and that I can totally recommend. A high-speed blender works too, but you may need a bit more liquid and patience to get it moving.
- Lighter, lemonier version. If you want something fresher and tangier, lean harder on the lemon and go easy on the tahini for a brighter dip.
- Switch the base. Swap the chickpeas for cannellini beans for a softer, milder spread, or build a flavored version with roasted red pepper, avocado, basil pesto, or arugula folded in.
- Adjust the garlic and cumin. Dial the garlic up or down to taste, and add a pinch more cumin if you like a warmer, more savory profile.
Storage and Make Ahead
Hummus is a great make-ahead dip. Transfer it to an airtight container, smooth the top, and pour a thin layer of olive oil over the surface before refrigerating. That oil seal is exactly why I always finish my hummus with oil rather than blending it in: it keeps the dip from drying out and helps it stay fresh for up to four or five days. Give it a quick stir and let it come closer to room temperature before serving, since chilled hummus firms up.
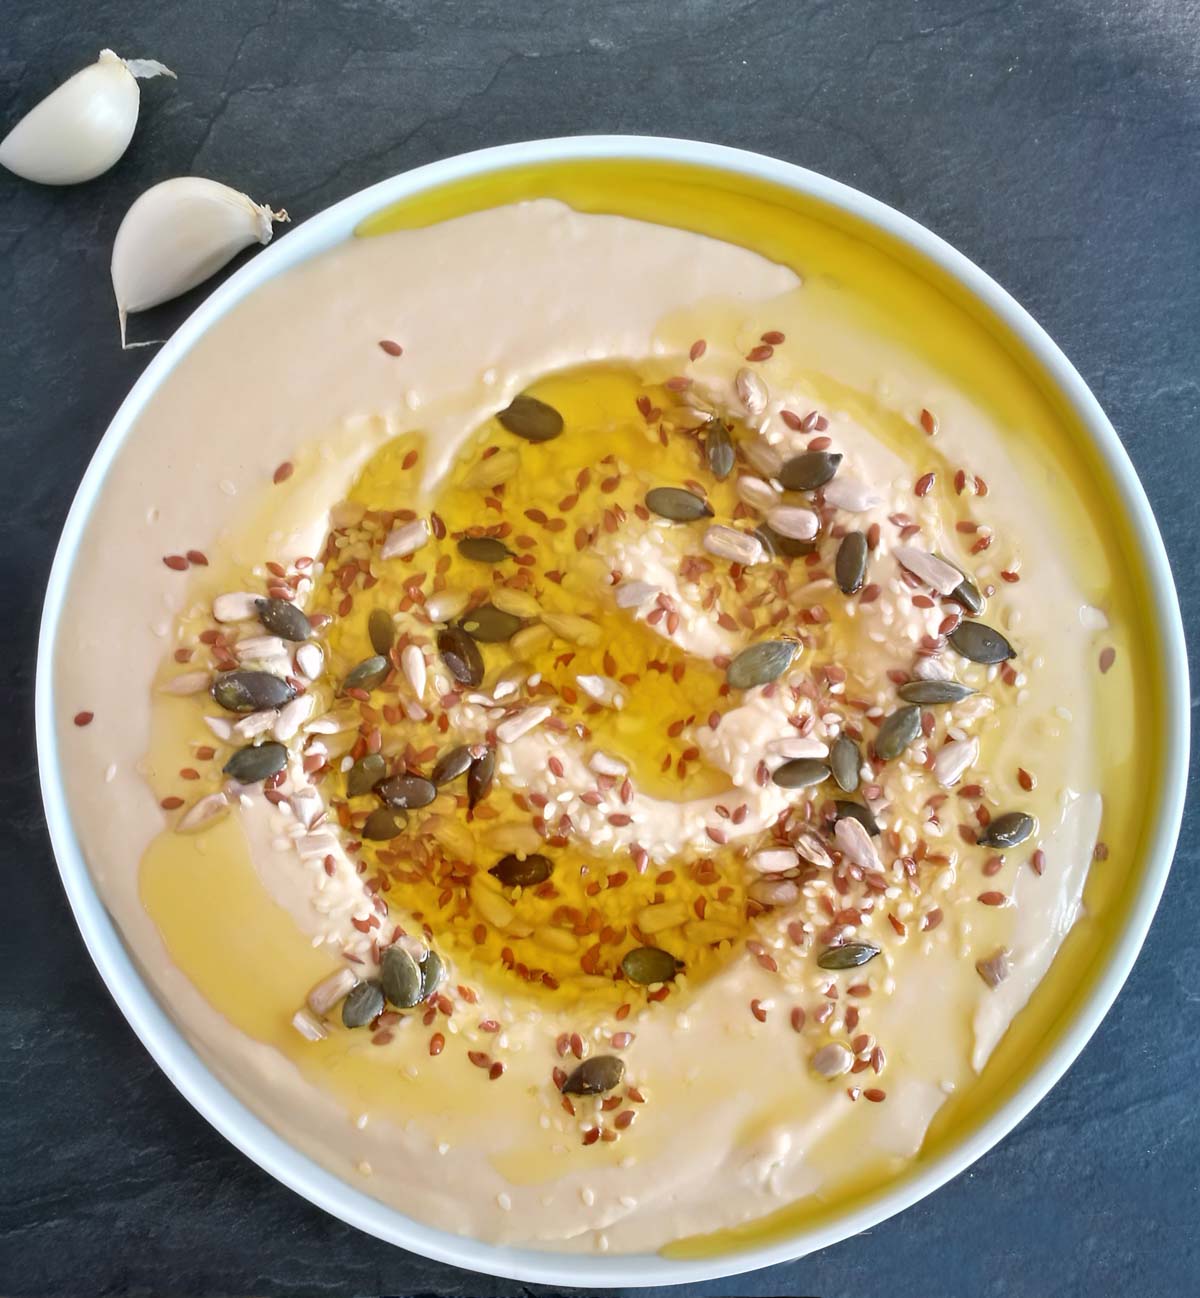
Serve it simply with a generous drizzle of olive oil, or pile on toppings like spices, fried seeds, or fried chickpeas. It is a natural fit for any chickpea-based meal and one of my go-to vegan snacks. And if you are a fanatic like me, you can even turn it into a full meal with my hummus pasta. I hope you use this basic hummus recipe whenever you are craving a big bowl of creaminess, and I promise you will get perfect results each and every time.
Summarise & Save This Recipe
★ Add us as a trusted Google source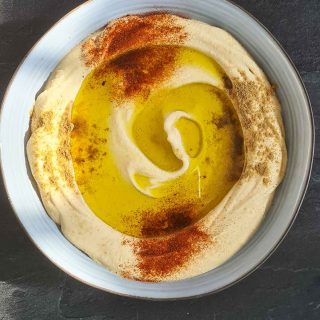
Best Hummus Recipe
Ingredients
- 2 cans chickpeas 400g each, drained – reserve the liquid from one of the cans
- 150 g tahini
- 2-3 cloves garlic
- ½ lemon juiced
- 3 ice cubes
- salt to taste
- ground cumin to taste, optional – a little goes a long way as it is very flavourful
- extra virgin olive oil for topping – mandatory; you can also add spices, fried seeds or fried chickpeas
Instructions
- Add the drained chickpeas to a pot and simmer for 15 minutes, then drain.
- Add the cooked chickpeas to a food processor. Pour in approx. 4 Tbsp of the reserved canned liquid, the lemon juice, garlic and ice cubes.
- Blend at high speed for 5 minutes. Stop once or twice to scrape the chickpeas down from the sides of the bowl so everything is processed evenly.
- Add the tahini and blend for another 5 minutes. Add a little salt. Gradually add more of the reserved canned liquid until you reach a creamy, smooth texture.
- I do not blend in the olive oil – instead I drizzle plenty on top of the hummus. This preserves it even better in the refrigerator and keeps it from drying out.
- Serve with various toppings or simply with a drizzle of olive oil.
Notes
Frequently Asked Questions
No, you do not need to peel the chickpeas. I tried it myself and found it too time-consuming to be worth it. Instead, simmer the drained canned chickpeas for another 15 minutes so the skins soften, then blend for a full 10 minutes total. That extra cooking and patient blending gives you a smooth, creamy result without peeling.
Adding three ice cubes while you blend is a trick that whips air into the mixture and cools it down as the cubes melt. The result is a paler, fluffier, almost mousse-like texture. I discovered it watching Reels and now use it every time I make this recipe.
Yes, canned chickpeas are perfect for hummus and what I use every time. They are consistent and save you from soaking dried chickpeas overnight. Just drain them, but keep the liquid from one can, since that starchy water is what you add gradually to reach a creamy texture.
I do not blend olive oil into the hummus. Most recipes do, but I prefer to add it only at the end, poured generously over the top of the finished dip. Beyond the flavor, that oil layer seals the surface and helps the hummus stay fresh longer in the fridge without drying out.
Stored in an airtight container with a thin layer of olive oil over the surface, homemade hummus keeps for about four to five days in the refrigerator. Give it a stir and let it warm up slightly before serving, since it firms up when chilled.
Yes. I make mine in a kitchen robot, a Philips one I can recommend, but a high-speed blender works too. You may need to add a little more of the reserved chickpea liquid to keep it moving, and avoid trying to blend all 800g at once. Work in two batches for the smoothest result.

Is it posibile to write myself in for newsletter(s) per mail?
Hi Clau! Sure! You can subscribe here https://gourmandelle.com/subscribe/
Perfect each and every time!
Thank you for the wonderful recipe. I’ve tried many times with other recipes, but none of them was as straight-forward and as delicious as this one. I boiled the chickpeas myself since I don’t trust the salt contend of the canned ones, and I just could not believe how creamy the result was, even without peeling them. Can’t wait for Hubby to taste it! I’m gonna try your hummus pasta next, oh my!
Efthymia from Greece
Thank you so much! It makes me happy to hear that my recipes are appreciated. 😀
Your love of hummus is ALMOST as large as mine used to be. I loved it before the rest of the world started putting it on everything, including sandwiches! I even used to dip mozzarella cheese into hummus!! Have you ever tried hummus with a drizzle of balsamic vinegar? Amazing. Or…smothered in roasted, buttery brussels sprouts?? People think bacon makes brussels worth eating. WRONG. It’s the hummus I literally used to put that sh*t on everything. I cannot eat it anymore due to some health changes…but I enjoyed those days…
Yum! Thanks for the tips! Made this and served it with your manakish recipe.
Awesome! Glad you liked the recipes.